Thursday, October 25, 2012

Assets

Just figured I'd post up what I had. All of the character parts are movable and changeable, the backgrounds are all in movable pieces so that I can manipulate parallax and subtle camera shifts. 


Not sure if I'm still utilizing a shift from desaturated at the beginning to bright at the end, but that will be easy to apply afterward in AE.


Honeybees and not-really-snow-white Turtledoves.


Figuring I won't need anything from the opposite angles, but that I could just mirror these in a pinch.

Tuesday, October 23, 2012

Remaining Schedule: Animation

Please note due dates, when there will presentations and critiques.
Please schedule work-time outside of class.

Week 9:    (This Week)
Work on assets and backgrounds
Work on 10 seconds
                 What is your artistic expression?  References?

Week 10
T 10 sec due
Attend talks upstairs?

Work on 10 seconds
Week 11 
T 20 sec due
Work on 30 sec

Week 12  
T 30 sec due
Major Critique
Work on Critique suggestions; Light, Textures, Color; Title & Credits

Week 13  
T Critique changes Light, Materials, Color adjustments due
Finalize All
Thanksgiving

Week 14  
T Finalized Due
Th Render Due

Week 15  
T 12/4 Animation Due to Glen upstairs for VIST SHOW
W VIST Show; Geren:  Artwork reception 5 pm; Animation show 6 pm

Week 16  
Digital Portfolio Due

Monday, October 22, 2012

Esquivel, Saslow, Davison Today 2:20, 2:40, 3:00 Geren!

Esquivel on Bubbles, me on recent art and where it came from, Dick Davison on Heavenly Architecture.  Geren Auditorium 2:20 - 3:20 to hear and see all three.

Thursday, October 18, 2012

Video Tutorial PS to AE Workflow and Hot Keys


Hot Keys

·         Ctrl/Cmnd I – import file

·         Shift/ - Scale to fit to composition, view

·         R – will reveal Rotation for Selected Layer

·         Cmnd/Ctrl Z – Step Back

·         End – Jump to end of composition

·         Cmd/Ctrl d – Duplicates Selected Layer

·         S – will reveal Scale for Selected Layer

·         P – will reveal Position for Selected Layer

·         G – Pen Tool

·         Cmnd/Ctrl C – Copy

·         Cmnd/Ctrl V – Paste

·         U – Reveal/Collapse all current key frames for selected layer

·         Shift Pg Down – 10 frames forward in time

·         J – jump back to previous keyframe

·         Cmnd/Ctrl A – Will select all layers

·         Home – jump to beginning of timeline

·         T – Reveal opacity

·         +/- Will zoom you in or out on timeline

Make Image in Layers on PS

Couple of ways to open up Photoshop file in AE (2:40)

·         Footage: everything is one flattened layer

·         Composition – Retain Layer Sizes (will look same as PS file, can edit PS file and automatic update)

·         Have Folders and Keep Everything Organized

·         Pan Behind Tool and then choose layer upon which you want to put anchor point on for rotation (4:25)

·         When spinning for rotation if you cross 360 degree mark it will count one revolution and so on, u can edit the number of revolutions, it is easier (5:39)

·         Before making copies, you should parent objects that need to be together

·         Parenting tool, click whip looking object under parent and drag to layer desired (7:50)

·         You can move Layers above and Below to put in desired order

·         Can scale object non-proportionally by selecting the bounding box handle, to scale proportionally hold down the shift key

·          Solo Button allows you to only view that layer, first button right of the eye on selected layer (12:40)

·         Can copy other layers from your different folders and copy and paste them into the document you are working on (13:14)

·         Holding Shift while dragging handle of layer will make it snap to lengths of other layers

·         Holding Shift while dragging an object will allow it to move only on the direction of axis desired (16:29)

·         Using Layer order to create a sense of depth

·         Can enter in any desired time code to jump to that spot in the timeline (17:51) (18:12)

·         Can move the layer and will automatically add the key frame to desired spot

·         Ease in on object – select desired key frame, go to animation toolbar, key frame assistant, easy ease in (changes key frame interpolation so that there is easiness on selected key frame) (19:14)

·         Clicking diamond to left of stopwatch will drop key frame in selected place

·         Move desired Layer behind time of cover up animation to avoid it being in shot (22:04)

·         Holding Cmnd/Ctrl will allow you to select multiple individual objects of layers (24:48)

·         Take finished Composition in put it in Master Composition, Draw Composition and Drop  (27:47)

·         Can trim preview section of your video by, grab yellow handle and slide (28:40)

Tuesday, October 16, 2012

ANOTHER ONE

http://vimeo.com/groups/2Danimation/videos/6693568

This one's a good ~2.5 D~ type deal. After effects!!!!!

My Favorite Thing Ever

http://verabee.com/snowbo.html

so good. so so good. look at me, sharing with the blog.

Watchmen Motion Graphic Comic

A Little Something

After Effects Review

http://tv.adobe.com/show/classroom-after-effects-cs5/


Episode Title Runtime CC Products Covered My Library
Part 1 - Animation and Compositing Basics 00:27:36
 
  • After Effects
 
Part 2 - Animation Technique and Keyframe Interpol... 00:26:54
 
  • After Effects
 
Part 3 - Masking and Duplicating Layers 00:23:44
 
  • After Effects
 
Part 4 - Parenting 00:09:36
 
  • After Effects
 
Part 5 - Pre-Comps and Master Compositions 00:23:50
 
  • After Effects
 
Part 6 – Photoshop to After Effects Workflow 00:30:39
 
  • After Effects
 
Part 7 - Final Touches and Rendering 00:31:43
 
  • After Effects


http://www.videocopilot.net/basic/

Effects
Expressions

Inspiration: Wolf Children

As you start to work on your animation, look at this example of level of detail, and motion of camera and placement of camera. Any special effects? Other?

REEL ANIME 2012: WOLF CHILDREN TRAILER (English Subtitles) [HD

http://www.youtube.com/watch?feature=player_embedded&v=8xLji7WsW0w

Friday, October 12, 2012

The Real Bears

Please watch for inspiration and information!

https://www.youtube.com/watch?feature=player_detailpage&v=myxwCEGcBYc

Wednesday, October 10, 2012

I have posted comments on all visual work here

I commented on all visual work that was on the blog.
Much of this was covered in class, but here are the comments anyway.
You can learn by reading the comments on other students' blogs too.
Did not comment on research or story, since we have discussed these so much in class. 
Happy Concept Art!  All work due midnight Thursday, as you know.

Tuesday, October 9, 2012

Basics of PS and AE

PS for Concept Art

You are working on your concept art (and then on whole script),
and should know enough Photoshop to do it.
Here are PS basics taught be Adobe.
Start with Changing the Photoshop view, end with Working with Zoom tool: 19 short tutorials = only 1 hour and 40 minutes.
http://tv.adobe.com/show/learn-photoshop-cs6/

AE for Animation

Set aside THREE HOURS to watch these -
Basic Compositing and Animation in After Effects
http://tv.adobe.com/show/classroom-after-effects-cs5/

Note particularly Photoshop to After Effects Workflow:
http://tv.adobe.com/watch/classroom-after-effects-cs5/episode-6/

This is an interesting one from After Effects CS6 Digital Classroom:
This one is 9781118142790 on camera flying in (and interesting layers)
http://www.youtube.com/watch?v=owO8aHt6TMc
You can look at other tutorials at this site, too.

WIP animatic

WIP Animatic. Still searching for some more music.

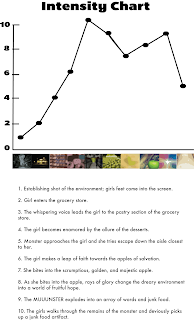
Intensity Chart


Saturday, October 6, 2012

Next week's work: end of basic design

SB 2:  Recently you made SB2: the cinamatic version of your storyboard.  You considered framing, motion of camera, motion of characters, transitions, cutting, etc.   You used the Transformation Tools in  the Composition Timeline of anchor point, position, scale, rotation, and opacity to pan, dolly, make close-ups and distant establishing shots, etc.  You ran through animation again and again for timing.  You added music.  We had crits of 7 of these; 3 more next Tuesday.

You based SB 2 on the Making Comics PowerPoint lecture, and on careful analysis of camera in Sleddin' by John Pettingill on Vimeo:  vimeo.com/4229747   You are continuing to refine your SB 2 after crit!

DUE TUESDAY: 
BRING INTENSITY CHART AND COLOR SCRIPT TO CLASS. BRING LINE ART BLACK AND WHITE CONCEPT ART DRAWING & Reference Images TO CLASS .  Do thumbnail sketches first to consider alternative construction and views.  

1)  Art Direction:  Intensity Chart and Color Script (Done before or after concept art.)   You can do this simply, but must carefully consider colors you want to use and include those at bottom of intensity chart. (You can also include colors as reference dots on PS shots if you like - you will later.)
 
2)  Concept Art: Design of Major Environment(s) (Establishing Shot(s)) in Photoshop
*You must gather reference images.
 
*Please study the following blog as a reference:  sleddin.blogspot.com
   Note particularly (in list on right in BLOG ARCHIVE):
   Lighting Paintovers
   FX paintovers
   Concept for set-dressing of final shot
 

*Study also at this demonstration of one way to find what you are looking for:
Feng Zhu Tutorial on Speed Painting of Concept Art:
http://www.youtube.com/watch?v=mmff8bBCYW4&feature=relmfu  
Episode 56 - MMORPG Landscapes  

Do Concept Art as black and white drawing on paper first.
In class we will bring black and white drawing into Photoshop.  Finish painting in PS in color/value. 
(Can be wider and taller than movie frame so you can pan or look up.)
Post to blog as flattened version when finished or as WIP (work in progress) as you go along.
(Keep original version in layers in PS so easier to animate later.)
Add detail, textures, light now if you have time, or wait until you start animation following week.
All work Due (including earlier work):  Midnight, Thursday Oct 11, MCS office: burn to disc.

Thursday, October 4, 2012

SMEAR BRUSH PRESETS THAT LOOK GOOD

ESPECIALLY WITH PEN PRESSURE WITH A TABLET


WITH STRENGTH AT 70%
AT HIGH SIZES IT GOES PRETTY SLOW BUT YEAH SERIOUSLY

Tuesday, October 2, 2012

Matthew Garrett, Character Design Cont.


As I continue to develop my storyboard in after effects I have been finalizing my character designs.  The water bottle on the left is starting to get the shape I want.  I think I will use the name 'TAP' with the same bottle design above.  I am not very sure about the eye placement for the watter bottle (the main character). I am very pleased with the Coca-Cola bottle and will continue to develop his appearance. 


Matthew Garrett, Intensity Timeline


Matthew Garrett, Intensity Chart